Greetings dear friends & readers
(warning .... photo heavy post so grab a cuppa or a tipple !!)
My dear friend Sally had a birthday coming up & after coming across this watering can in my sleepout, I decided to paint/revamp it as a gift for Sal.
These are just the aluminium watering cans that you can buy from Hardware Stores.
I pulled the half-lid off the top & then proceeded to paint it by my fire over a couple of days.
I used a lovely colour Chalk Paint called "Grey Mist"
After I was happy with my coverage I applied some transfers to both sides of it and . . . . . . .
. . . . . . . I also applied some to the spout.
To finish it off I tied a swing tag to the handle.
I had initially planned to plant it up for Sal, but in the end I decided to just include a garden voucher so she could choose what she would like planted in it herself.
Some knitted cotton dishcloths & a handmade soap also got popped in the birthday parcel . . . . . .
. . . . . . . along with some Mars Bar Slice & Gingernut Bites as I know she loves my baking 💗
I received the loveliest message from Sal to tell me how delighted she was with her parcel.
This next part of my post is especially for Gail & Sarah who both contacted me after my post about my Fireplace Mantle & asked if I could please share more info on the "fairy/snow queen dome" shown on my mantle
Happy To !!! 😊
This glass dome came from my Mum - I think she had received it as a gift but decided she only wanted the imitation succulent inside & not the dome itself.
Here is an image borrowed from the web of what it originally looked like.
For my part - I was more than happy to receive the glass dome & it sat there for many months before I finally decided to do something with it during our Lockdown.
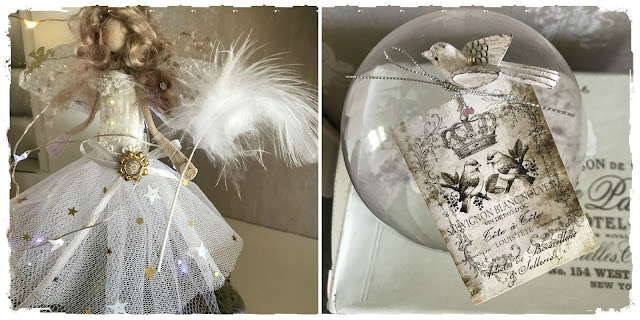
I had the vague rumblings of an idea of what I wanted to achieve ... so I hunted out this wee fairy from amongst my Christmas decorations
I painted the wooden base, then glued on torn music papers & glued one of Sid's building blocks to the centre base as a prop.
I covered this with some dried moss (Yes I do keep all these bits on hand!!) then I glued a large bead to one side & covered it in moss - as I wanted a prop to sit my small tree on.
I made a small "banner" with music paper & a brass tag & glued this in place ... also tucked a tiny porcelain cherub in the other side.
The fairy got her wings, hair & belt removed & then I added my own dolls hair & wings as well as adding in lots of sparkly embellishments, pearl beads, more sequins to her skirt & I even made her a halo from florists wire.
Everything was either stitched or glued in place & it all came from my stash - nothing was purchased as there were no shops open !!
I gave her a feather for a wand & then I glued a porcelain bird (also found in my Christmas stash) to the top of the dome & tied a French tag to this.
I hot glued her onto the mossy base making sure she was really stable - I also carefully wound a small set of fairy lights up around her.
Here she is in all her glory with the lights on ... the new mantle is just the perfect place to display her 💕
Last night as I was going to bed I snapped this pic of my mantle with all my fairy lights on ... Yes I do like to live in a bit of a wonderland 😉
Thank You all So Much for staying with me through this lengthy post but before we go, let's just play a wee game called "Can you spot the fairy ??"
 |
| This "game" happens most mornings when I am attempting to make my bed !!! |
Wishing you a wonderful week ahead dear friends,
Be kind to yourselves & to each other,
With much love & friendship to you all,
Julie & the furry ones x0x0x0


