Saturday, August 31, 2024

As August Draws to a Close

 Greetings lovely friends & readers

Here we are on the final day of August & Spring is right around the corner ...............


Last Friday Alec had his school Grandparents Day which they combined with a Book Character Dress-Up Day.      Alec went as a Wizard from Lord of the Rings, & I went as a Granny  😉


Over the weekend I was asked to help with Sid's costume for his school Wearable Arts Competition.  The theme was "rural" & Sid chose to go as a Compost Heap (!!!)  Yes you did read that right!
  I made a simple hessian tunic & we dried orange & lemon slices in my dehydrator then his Mum glued on all the rest of the foraged items, including making him the hat which took 3 prototypes to get right.  Personally I thought he made rather an adorable little compost heap.  (& he was the only one in the entire school!!!)


Last week I had to go to the Variety Store for tissue paper so I purchased another 2 white plastic Urns - small & large sizes, as I decided I wanted a set of 3 & I showed the medium size in my last post.  Once again I gave them 2 coats Resene Black Test pot paint first.


I find they dry much better by the fire this weather.  
Now Miss Pippi takes her watching-paint-dry-duties very seriously, but I noticed she fell asleep on this particular occasion.  These are the rust products I used above right.

It absolutely fascinates me watching the rusting process take place.  I spritzed these 2 with more water than last time & I noticed they took on a darker, more mottled effect.  


I had some violas left over in a punnet so these got planted in the larger size & I planted some perennial Polyanthus in the smaller size pot  (from out of my garden).  

I'm really happy with this display on my deck table & it's giving me all the spring vibes  💛


This morning I got up early, hunted out Mum's old recipe book & made her Fruity Chocolate Cereal Bars - 
a VeRy old recipe in the book, so old it's almost ineligible to read. (I'll write it out at the bottom in case anyone should want it - makes a good big quantity in my meat dish)
Today is exactly One Year since my dear Mum passed away.  In fact as I sit here typing this ... this very time last year I was driving frantically down to be with her as the Resthome had rung me urgently.  


There is a sweet young lady in my local village of Kihikihi who has a roadside stall outside her house selling flowers.  I had ordered a bunch of pink flowers for Mum - look how beautiful they are - $20 for the bunch.  I'll enjoy these then dry them to take to Mum's ashes plot.

I'm burning a homemade candle today & playing Mum's favorite songs - she is never far from my thoughts.  

A dear friend sent me this verse this morning & I thought it was so lovely  💗


The rain we were forecast is now pouring down & the furry ones are all tucked up inside ... Yes Little One is sleeping on the ironing board!  😑

Wishing you all a wonderful weekend dear friends - thank you as always, for your welcome visits here today,

Sending much love & friendship to you all,

Fruity Chocolate Cereal Bars:
3 cups crushed cereal  (muesli, cornflakes, weet-bix)
1/2 cup rolled oats
1 1/2 cups dried fruit (raisins, sultanas, apricots,cranberries)
1/2 cup coconut thread
1 cup chocolate chips, buttons or pieces
1/2 cup toasted cashew nuts or almonds
100 gm butter
150 ml honey, golden or maple syrup
Line a slice tin with baking paper (I use my meat dish)
Combine all dry ingredients in large bowl.
Melt together butter & honey or syrup, simmer for about 5 minutes stirring constantly.
Combine dry ingredients with syrup & press into the baking dish, place in fridge for a couple of hours.
Once cold cut into portion size bars.  Keeps for a very long time (not in my house!!)  😉


Tuesday, August 20, 2024

Rusting Things ................................

Greetings lovely friends & readers

At the beginning of last week we ran completely out of firewood & our house was Oh So Cold!  I was able to borrow some from youngest son but still not able to light the fire until the end of each day, when usually I have it going all day long (& most of the night). Finally we got another load delivered on Friday & I lit it right away - the two furry ones were so pleased & took up residence in front of it for the entire day.


 Yes they are both wearing "their winter coats - plus a couple of others (!!)" but we won't mention Pippi's size as it's rude to discuss a ladies weight issue as we all know 😉

Those that know me well know I love an old rusty treasure.  I spend hours scouring the Jeanne d'arc living magazines that my friend Sally lends me & when I visit the French Shop I always drool over the rusty Urns & Figurines that are wayyy out of my budget & even if they were reduced by 70%, they'd still be way out of my budget!  I've wanted to have a go at rusting things for quite some time & winning the Resene voucher * here *, inspired me to try my hand at this Product Resene FX Faux Rust Effect

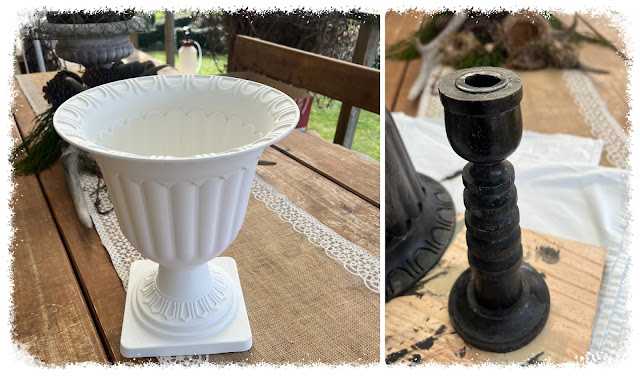
I'd purchased this white plastic urn from the Variety Store sometime ago & the wooden candlestick was a 50 cent thrifted item. It was covered in old wax but I was able to remove this by tipping boiling water over & scrubbing it.  
The lady in Resene told me I could Not use the product on plastic but upon talking to the Rep, he told me it's the products that react with each other, not the surface they are applied to.  This made me think that I could paint the plastic first to seal it & give the rust FX something to adhere to, then apply the products.  The lady then told me I couldn't apply paint to plastic surfaces ... Just watch me I thought to myself 😉
I've learned so much about painting items over the years, mainly through my own mistakes & felt confident tackling this but also realising that if it didn't work out, I hadn't ruined an expensive item.


First up I painted both items with some plain black Resene testpot that I already had - 2 coats to give a good seal.  I let this dry well.

As it was a wintery day I dried the items well by the fire between coats

With the Rust FX products you apply the basecoat first, wait 4 hours then apply a 2nd basecoat (this is dark grey in colour). When the 2nd basecoat is still tacky you apply the first coat of the Activator - this is all brushed on, not sprayed. As soon as the first coat of Activator is touch dry, apply a 2nd coat. It began to rust after the second coat & I became quite excited.  Repetitive water misting afterwards will help develop the rust effect - this is what I am doing in the right photo.

I've had this Urn inside but if I put it outdoors I am sure the moisture in the air would rust it further as this is what I've noticed with the candlestick, which has taken on a really deep rusty tinge sitting out on my deck table. 


I'd hoped to plant the urn with some miniature tete-a-tete daffodils but there are none available as yet - too early.  So I planted some miniature violas in it instead.

These look a bit bedraggled as I only planted them this morning but I'm hoping they settle nicely into the urn. 


Encouraged by my "success" I dragged this figurine out of the far reaches of my garden & scrubbed it well.  This is concrete & came from Mums years ago.


Also this other heavier weight plastic urn above left.   I gave them both 2 coats plain white acrylic paint, drying well by the fire.

I repeated the same steps as above following the instructions to the letter.


I was thrilled with how they both turned out - I think I could lightly sand the concrete figurine to give even more effect & age to it.

Here is how I have styled them both on my lounge mantle piece.


The small cherub bottom right, is also out of my garden but she was already rusty - she's a rain gauge (was).

Here is a recap of the before's & after's.  I realise the rusty effect is certainly not to everyone's liking & to be honest The Mr just shook his head when I showed him.  But I love it & already have some tin buckets & other items lined up to try the treatment on.


Thank you so much dear friends, for staying through this lengthy post,

Wishing you all a wonderful week ahead, remember to be kind to yourselves & to each other,

Sending much love & friendship to you all,


Wednesday, August 14, 2024

Finishing Things

 Greetings lovely friends & readers

                       My lovely sweet friend Jennifer of elefantz designs has been gently encouraging us to use August as                               a month for finishing things  ... & she very generously shared a free pattern in *this post* for a notebook titled "Finish What I Started"


Feeling rather overwhelmed by the baskets of half finished projects in my sewing room I decided to follow along with Jennifer's August theme.


When I was growing up our kitchen had one of those old fashioned safe cupboards with mesh squares on the inside. Mum always kept her potatoes & onions in this cupboard, in the yellow tin dish above. Over the years it had gone rusty & I didn't especially like it, but when I cleared out No 44 last year, for some reason it came home with me.  I decided to revamp it so the first thing I did was lightly sand & then treat the rust with Fishoilene (found in The Mr's shed)

Then I gave it two coats chalk paint in the colour "Country Clay".  It turned out really nice so I applied some oddments of leftover transfers, just to the front.


Now what will you use it for Julie ...............  ???

In a basket in my sewing room were these mini stitcheries that I'd started to embroider awhile ago.  I'd purchased a large preprinted panel from Millymac Supplies, picked out some I liked & begun to stitch them, but gone no further.  I finished them off, then sewed them into mini pillows which I filled with crushed walnut shells.  

I backed my mini pillows with tiny offcuts of Tilda fabrics in co-ordinating colours.

This vintage cross stitch was sitting in the same basket as the stitcheries - I've no idea where it came from, possibly thrifted .. but I loved the deer & the pretty pastel colours.  I found a frame that fit it perfectly (Yes I do have a frame stash along with all my other stashes), painted this the same Country Clay colour, then framed the sweet deer.


This piece of brown linen already had the decor transfer applied to it - this was one of my "I-wonder-if-it-will-adhere-to-fabric" try-outs 😉 I made it up into a heart & stuffed it tightly.  The keys were in a drawer with other oddments so I tied them together with lace.


The decoupaged tag was sent to me by my friend Joy when Mum passed away & I loved it.   I lined the tin dish with 2 of Mum's doilies - all beautifully ironed & starched to within an inch of their life, just how she used to keep them.  


My eclectic arrangement of handcrafts fit perfectly in Mum's old spud-&-onion-dish & I LoVe it  💛 
That's quite a few smaller items ticked off my finishing list - how wonderful!

I've displayed it on the vintage Singer Sewing table in a corner of my dining room where I can enjoy it.  
And if you were wondering ... Yes I am rapidly running out of space for all these displays (!!)

On the subject of finishing things ... my dear friend Shirley asked me to paint this wooden bowl/dish for her & also if possible, the cookies container which was thick heavy-duty cardboard.


The round bowl painted up nicely in Vintage White Chalk Paint & I gave it a good wax to protect it. Shirley plans to display tiny balls of wool in pretty colours in this & call it her "beautiful bits bowl". 💗


When I removed the stickers from the round container some of the surface came away with it - they were stuck like glue!  I lightly sanded these areas but could still see it after painting so I chose a pretty floral serviette & decoupaged this over the 2 areas - Shirley was delighted with it. 


I cannot tell you how excited I was to see the first voluptuous pink bud on my magnolia tree last week.  How special.  Then when I dropped Sid off yesterday I noticed their stunning tree in full bright bloom.  Spring is coming dear friends  .  .  .  .  .

Wishing you all a wonderful rest of the week.
Thank you, as always dear friends, for your ever-welcome visits here today,
With much love & friendship to you all,


Thursday, August 8, 2024

Mum's Bedside Cabinet

Greetings lovely friends & readers

Here at the bottom of the world we welcome August as our last official month of Winter ... Spring is just around the corner dear friends 💚

Image from Pinterest

Last Thursday I had hoped to start pruning my roses but the weather had other plans & it turned out a dreadful day, cold, windy & constant rain.  I decided to drag Mum's old bedside Cabinet inside & paint it.

I remember when Mum bought this bedside cabinet (that is what we call it but some may call it a chest of drawers) - she was so excited as she also purchased a matching bed headboard at the same time.  
When Mum moved to the Resthome she took this cabinet with her & it sat beside her bed for the 15 months she was in Care.  
When Mum passed away & my brother & I cleared her room out, he took this on the back of his Ute to deliver to the local Hospice Shop ... I followed him all the way & before he could drop it off I put it in the back of my vehicle.  Though I had no use for it in mind, I am so pleased I did grab it.


I'd been putting off painting it for nearly a year now.  I'm not sure why but I imagined it might be a horrid thing to paint.  I could not have been more wrong - it painted up beautifully.  I used a roller, the same as I did when I painted Mum's Glory Box *here*..  Two good coats & the coverage was amazing - the same colour chalk paint - Linen ... rapidly becoming a favorite.  

Waiting to be Waxed                                                  Waxed but not quite dry

I had some transfers left over from the Glory Box revamp so I decided to use them on the drawers.  These packs of Re-design transfers are not cheap but I save & use every single leaf, flower & offcut - nothing is wasted.
I bought 3 new handles from Mitre 10 & love the slightly antique look of these.  

I am so in love with my bedside cabinet & the drawers glide like magic - I am used to vintage drawers where you usually have to put your full body weight behind opening them (!!) 😉

I have started to cut the brown off before I photographed it - it was such a sorry sight.

Last week I had to go to the Warehouse to buy a tarp for our firewood.  As I was walking to the checkout there was a large display of half dead ferns greatly reduced.  I picked up this ladder fern & went to pay for it ($5) - when the checkout girl rang it up she said it was originally $27.00 !! 
I had this pot on my deck with a dead plant in it - the handles had some rust spots on but I was able to remove these & give it a good scrub.  The pot is metal, not plastic but I loved its unusual shape & texture.

The poor fern had so many dead leaves - I gave it such a haircut,  then repotted it into this large black plastic pot which sat perfectly in the white urn.  I applied the last of the transfers from my bedside cabinet to the urn & sat the pot inside it.  

I am really enjoying the addition of houseplants to my bedroom & they seem to do so well as the room gets wonderful afternoon sun when the weather is nice. 


I was delighted to see my white moth orchid finally flowering after its repot in * this post *.  This one has not flowered for 3 or 4 years now so it was extra exciting.


Remember in *this post* where I accidentally broke off the large stem of buds on my pink orchid?  Well the smaller stem underneath has valiantly tried to put on a bit of a floral display.  The stem snapped off where the arrow is.


A few flowers picked this morning before the rains came ... a friend told me to dip my hellebore stems in boiling water before putting them in a vase.  I am hoping this stops them wilting as I've not had great success with having them indoors before.

It's a cold rainy day here today & even though the fire is roaring Madam Pip has found the least comfy place she can to go to sleep & I think perhaps her tongue shows just what she thinks of it all 😉

Yesterday I received a wonderful surprise package in the post. I'd entered an online competition ages ago for Resene Paints whereby you had to submit photos of any things you'd painted for your garden using Resene Paints.  I can barely remember what I submitted now but I think it was all the things I paint with the Red Hot Chile colour & also the Green Paddock colour.  Whilst I didn't win they were so delighted with my entry that they sent me a $100 Resene Voucher which arrived along with this paint tin, filled to the brim with Smarties choccies!!                                          Well it was filled to the brim ... I blame that ginger girl cat 😉😲


Thank you dear friends, for your ever-welcome visits here today,

Wishing you a wonderful rest-of-the-week,

With much love & friendship to you all,